Do not stare into the laser beam or view directly with optical instruments
Pipe Laser Setup
A pipe laser can be setup a few different ways. The first is with the pipe laser set in the pipe, it can set in a pipe 6” or greater. It can also be used on a tripod or setup on a trivet plate that goes in the manhole or setup on a spreader bar that will span the manhole.
Setup - Align the laser in the pipe or invert. Align the level vial located behind the carrying handle so it is in the center position.
Angle errors of up to + or - 3 degrees have no significant influence on the accuracy of the beam.
Calculating Grades for a Pipe Laser
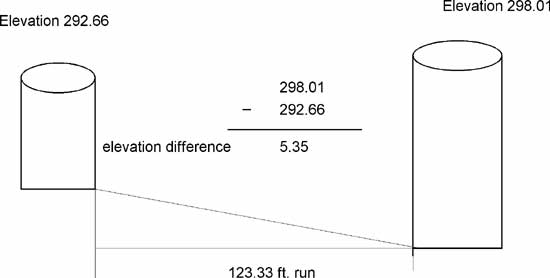
1.) Determine the elevation difference between the two manholes
2.) Find the distance between the two manholes.
Usually plans will show pipe slope expressed as per one foot of run (.0433).

5.) Divide the elevation difference by the run
(5.35 divided by 123.33 =.0433 rise for one foot of pipe)
6.) If the pipe laser you are using reads pipe slope in percent (that is what the rise is at 100 feet) then multiply rise for one foot of pipe times 100 to get percent of slope.
Pipe Laser Grade Setting
Grade setting turn laser on by pressing the power key. The laser beam and the display will flash with the last entered value. Use the plus and minus keys to select the desired grade. Plus is upward from the exit window.
When the desired grade is displayed, press the set key. The laser will then self-level to the entered grade. When the laser beam remains on and the “HOR” is constantly displayed on the LCD, the unit has been self leveled.
Line adjustment is adjusted by either left or right arrow keys. It is advisable to start with the line adjustment in the center.
Pipe Laser Calibration
Calibration needs to be checked and adjusted in an approved service center and a qualified technician.
Calibration should be done at lease once a year.