|
|||
|
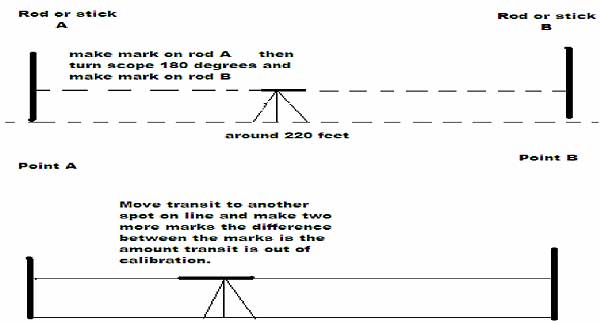
How To Use Auto Levels An Auto Level is a level with a compensator. Auto Level Setup1. Setup your tripod as level as possible, step on tripod legs to drive into the ground. 2. Attach auto level to the tripod. 3. Adjust level so bubble is centered in vial. 4. Adjust recital until crosshairs are clear. 5. Adjust the objective lens until object you are sighting on is clear. Care of Auto LevelsIf the instrument becomes wet leave it unpacked. Wipe down instrument, clean and dry transport case. Pack up instrument only when it is perfectly dry. Never touch the glass with fingers, use soft clean lint-free cloth to clean lens. Checking Auto Level Accuracy1. Set up instrument in an area that is as level as possible and which is about 220 feet long. Place two matching level rods or two pieces of strapping in the ground about 200 feet apart with the faces toward each other. Position and level the instrument so that the distance from the instrument to each rod is the same measure. 2. Take a reading on each rod with the instrument (or mark each piece of strapping where the crosshair is sighted). 3. Move transit to another spot on the line and take readings and mark both rods again. 4. The difference between the marks on the rod will be the error of the instrument.The error needs to be corrected by a competent repair technician.
Auto Levels need to be calibrated at lease once a year or when unit has been dropped or hit.
|
|||
|
|